컴포넌트 제작 생산성을 높이고 싶을 때는 컴포넌트 제너레이터 Hygen을 도입해보자
1. Hygen 이란?
1-1. 특징
1) 디자인 시스템과 코딩 컨벤션이 그라운드룰로 정해져있는 경우 유용함
2) 자바스크립트 기반의 코드 제너레이팅 툴
3) 특정 프레임워크나 라이브러리에 의존적이지 않음
1-2. 장점
1) 같이 개발하는 사람들과 컴포넌트 구성요소 및 디렉터리 구조를 통일 시킬 수 있다.
2) 반복적으로 작성해야 하는 코드를 쉽게 만들어 개발 생산성을 향상 시킬 수 있다.
3) 약간의 node.js 지식을 가지고 있으면 쉽게 템플릿 생성자를 만들 수 있다.
1-3. 단점
1) react snippet extension 을 추가하는 것 처럼 명령어를 추가로 기억해야한다.
2) 코딩 컨벤션이 바뀌게 되면 지속적으로 관리를 해주어야 한다.
3) ejs 문법에 익숙하지 않으면 여러 예외상황에 대처하기 어렵다.
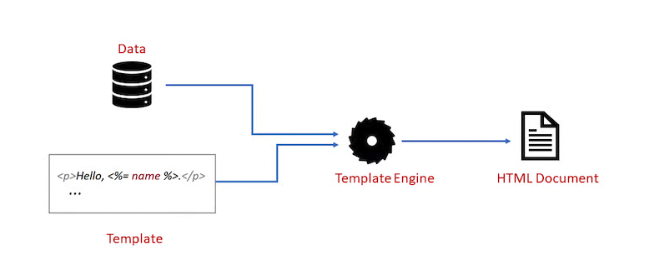
1-4. .ejs (Embedded Javascript Template)
1) node.js 에서 동적 웹페이지를 (HTML) 만들기 위한 템플릿 도구
2) 구조 : 템플릿 + 데이터 모델 → HTML 문서 제작
* ejs 문법 훑어 보기
1. 변수

<p>My name is <%= name %></p>
<%= bar %>

2. if, else if, else

<% if (route2) { %>
import <%= route2 %> from 'src/<%= route2 %>'
<% } else if (route1) { %>
import <%= route1 %> from 'src/<%= route2 %>'
<% } else { %>
import <%= name %> from 'src/<%= name %>'
<% } %>

3. 템플릿 문자열

`src/foo/bar/${variable}`
1-5. 구조
디렉터리 구조에 따라서 명령어를 입력하면 지정한 템플릿으로 정적 소스가 생성됨
2. Hygen Getting Started
명령어 구조
hygen [generator] [action] [NAME]
2-1. hygen 명령어를 사용하기 위해 전역 패키지로 설치
npm i -g hygen
* Homebrew를 사용한다면 아래 명령어로도 설치 가능합니다.
brew tap jondot/tap

brew install hygen
2-2. 원하는 프로젝트의 루트 디렉토리에 hygen 도입
선택한 디렉토리에 _templates 형태로 생성되기 때문에 루트 디렉터리에서 아래 명령어를 입력하면 됩니다.
hygen init self
2-3. 템플릿 생성
hygen generator new [생성하고 싶은 템플릿 명]
hygen generator new common-component
2-4. 템플릿 기반으로 컴포넌트 생성
hygen [생성한 템플릿 명] new
hygen common-component new
3. 세부 설정 해보기
3-1. 템플릿 파일 생성하기
생성된 .ejs 파일의 구조는 Frontmatter, Template Body로 나뉘어 있다.
1) Frontmatter
`---` 으로 구분되어 있고 생성될 파일의 메타데이터를 지정하는 곳이다. 아래 예제에서는 생성될 파일 경로를 지정하는데 사용하였다.
2) Template Body
node.js prompter 에서 입력받은 변수를 body에서 ejs 문법을 사용해서 정적파일을 생성할 수 있습니다.
미리 정의된 라이브러리를 사용하면 직접 유틸 함수를 정의하지 않고 네이밍을 쉽게 할 수 있습니다.
// _templates/example/components/components.ejs.t
---
to: src/components/<%= name %>/<%= name %>.tsx
---

export interface <%= name %>Props {
  className?: string
}

export default function <%= name %>({ className }: <%= name %>Props) {
  const [example, setExample] = useState('')

  const exampleFunction = () => {}

  useEffect(() => {

  }, [])

  return (
    <div className={className}>
        <></>
    </div>
  )
}
⇒ 위 디렉터리 구조로 템플릿을 제작하였다면 컴포넌트를 생성할 때는 hygen example components new 명령어를 입력하면 된다.
3-2. 프롬프터 만들기
1) prompt는 thenable 문법으로 확장시킬 수 있으며 type으로 숫자, 문자, 리스트 등을 콘솔에서 입력받아 원하는 형태로 ejs 파일에 변수로 넘겨줄 수 있다.
2) prompter는 다음 프롬프터 명령어를 실행시킬 때 사용하고 args에서 콘솔에서 입력받은 변수를 조작할 수 있다
// _templates/example/components/prompt.js
var { toPascalCase } = require("../utils.js");

module.exports = {
  prompt: ({ prompter, args }) => {
    return prompter
      .prompt({
        type: "input",
        name: "name",
        message: "컴포넌트 이름을 PascalCase 로 입력하세요.",
      })
      .then(({ name }) => {
        if (!name) {
          throw new Error("컴포넌트 이름을 입력하세요!");
        }
        if (!new RegExp(/^[a-zA-Z0-9]*$/).test(name)) {
          throw new Error("컴포넌트 이름은 PascalCase 이여야 합니다.");
        }

        return {
          name: toPascalCase(name),
          args,
        };
      });
  },
};

// _templates/example/utils.js
module.exports = {
  toPascalCase(string) {
    return `${string}`
      .replace(new RegExp(/[-_]+/, "g"), " ")
      .replace(new RegExp(/[^\\w\\s]/, "g"), "")
      .replace(
        new RegExp(/\\s+(.)(\\w*)/, "g"),
        ($1, $2, $3) => `${$2.toUpperCase() + $3.toLowerCase()}`
      )
      .replace(new RegExp(/\\w/), (s) => s.toUpperCase());
  },
  toKebabCase(string) {
    return string
      .replace(/([a-z])([A-Z])/g, "$1-$2")
      .replace(/[\\s_]+/g, "-")
      .toLowerCase();
  },
}
* 소스코드 원본 레포지터리
GitHub - canoe726/hygen-template
Contribute to canoe726/hygen-template development by creating an account on GitHub.
github.com
4. 프로젝트 적용 예시
next.js 프로젝트에서 페이지를 만들 때 마다 pages, pageComponents 에 url 경로명에 해당하는 템플릿이 필요해 자동 생성하는 코드를 작성해보았다.
4-1. generator
// pages.ejs.t
---
to: "<%= route1 ? route2 ? `src/pages/${name}/${route1}/${route2}/index.tsx` : `src/pages/${name}/${route1}/index.tsx` : `src/pages/${name}/index.tsx` %>"
---
<% if (route2) { %>
import <%= fileName %>Main from '@/pageComponents/<%= name %>/<%= route1 %>/<%= route2 %>/<%= fileName %>Main'
<% } else if (route1) { %>
import <%= fileName %>Main from '@/pageComponents/<%= name %>/<%= route1 %>/<%= fileName %>Main'
<% } else { %>
import <%= fileName %>Main from '@/pageComponents/<%= name %>/<%= fileName %>Main'
<% } %>

export default function <%= name %>Page() {
  return <<%= pascal %>Main />
}

// pageComponents.ejs.t
---
to: "<%= route1 ? route2 ? `src/pageComponents/${name}/${route1}/${route2}/${fileName}Main.tsx` : `src/pageComponents/${name}/${route1}/${fileName}Main.tsx` : `src/pageComponents/${name}/${fileName}Main.tsx` %>"
---

export default function <%= fileName %>Main() {
    const [example, setExample] = useState('')

    const exampleFunction = () => {}

    useEffect(() => {

    }, [])

    return (
        <section>
            <></>
        </section>
    )
}
4-2. prompter
var { toKebabCase, toPascalCase } = require("../utils.js");

module.exports = {
  prompt: ({ prompter, args }) => {
    return prompter
      .prompt({
        type: "input",
        name: "name",
        message: "페이지 디렉토리 명을 kebab-case 로 입력하세요.",
      })
      .then(({ name }) => {
        if (!name) {
          throw new Error("페이지 경로를 입력하세요!");
        }
        if (new RegExp(/[^a-z\-]/).test(name)) {
          throw new Error("페이지 디렉토리 명은 kebab-case 이어야 합니다.");
        }

        return prompter
          .select({
            type: "input",
            name: "category",
            message: `route1 경로를 추가하시겠습니까?\nsrc/pages/${name}/{:route1}`,
            choices: ["Y", "N"],
          })
          .then((choice) => {
            if (choice === "Y") {
              return prompter
                .prompt({
                  type: "input",
                  name: "name",
                  message:
                    "route1 페이지 디렉토리 명을 kebab-case 로 입력하세요.",
                })
                .then(({ name: route1 }) => {
                  if (!route1) {
                    throw new Error("페이지 경로를 입력하세요!");
                  }
                  if (new RegExp(/[^a-z\-]/).test(route1)) {
                    throw new Error(
                      "페이지 디렉토리 명은 kebab-case 이어야 합니다."
                    );
                  }

                  return prompter
                    .select({
                      type: "input",
                      name: "category",
                      message: `route2 경로를 추가하시겠습니까?\nsrc/pages/${name}/${route1}/{:route2}`,
                      choices: ["Y", "N"],
                    })
                    .then((choice) => {
                      if (choice === "Y") {
                        return prompter
                          .prompt({
                            type: "input",
                            name: "name",
                            message:
                              "route2 페이지 디렉토리 명을 kebab-case 로 입력하세요.",
                          })
                          .then(({ name: route2 }) => {
                            if (!route2) {
                              throw new Error("페이지 경로를 입력하세요!");
                            }
                            if (new RegExp(/[^a-z\-]/).test(route1)) {
                              throw new Error(
                                "페이지 디렉토리 명은 kebab-case 이어야 합니다."
                              );
                            }

                            return {
                              name: toKebabCase(name),
                              pascal: toPascalCase(name),
                              route1: toKebabCase(route1),
                              route2: toKebabCase(route2),
                              fileName: `${toPascalCase(name)}${toPascalCase(
                                route1
                              )}${toPascalCase(
                                route2.replace("[", "").replace("]", "")
                              )}`,
                              args,
                            };
                          });
                      } else {
                        return {
                          name: toKebabCase(name),
                          pascal: toPascalCase(name),
                          route1: toKebabCase(route1),
                          route2: "",
                          fileName: `${toPascalCase(name)}${toPascalCase(
                            route1
                          )}`,
                          args,
                        };
                      }
                    });
                });
            } else {
              return {
                name: toKebabCase(name),
                pascal: toPascalCase(name),
                route1: "",
                route2: "",
                fileName: toPascalCase(name),
                args,
              };
            }
          });
      });
  },
};
- hygen에 대해서 더 알고 싶다면?
1. 공식문서
Hygen | Hygen
Description will go into a meta tag in <head />
www.hygen.io
2. 참고 블로그
Hygen을 이용한 컴포넌트 템플릿 만들기 | 우아한형제들 기술블로그
{{item.name}} 이 글에서 다루는 것 이 글을 따라가기 위해서는 React에 대한 가벼운 지식과 CLI를 활용할 수 있는 환경이 필요합니다. 이 글은 Node.js 환경에서 직접 작성한 템플릿을 이용해 컴포넌트
techblog.woowahan.com
3. nodejs prompt
Node.js Prompts
Node.js Prompts Prompt interface overview Each user prompt is configured in a JavaScript definition object. One or more of these objects can be passed to a ux.prompt call to obtain user input; the prompts will occur in sequence automatically. User input wi
cto.ai
How To Create Interactive Command-line Prompts with Inquirer.js | DigitalOcean
www.digitalocean.com
'웹 프론트엔드 > 트렌드' 카테고리의 다른 글
| SSR과 SEO가 웹 서비스에서 왜 중요할까? (0) | 2022.12.18 |
|---|---|
| 패키지 전략 모노레포(Monorepo) 알아보기 (0) | 2022.11.25 |

댓글